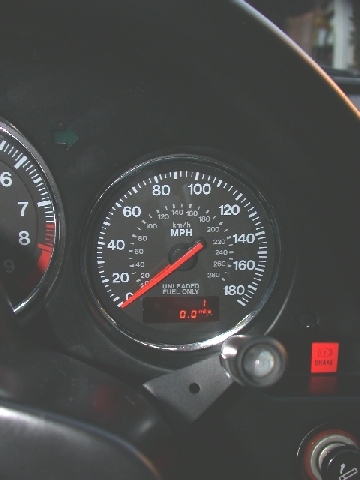
Twas one of those days when your heart sinks into your stomach and you are faced with a problem that you just KNOW is going to give you sleepless nights until it's been fixed. In my case it was the odometer. After successfully installing an upgraded flywheel and clutch assembly I drove the car for a couple days to "break-in" the new hardware and glanced down at the speedometer and saw on the odometer......NOTHING! A completely blank screen. Oh boy here we go....
First thing that was puzzling was that the speedometer was still functional yet the odometer was not. I know from past experience that the speedometer and odometer are one in the same unit sharing a common circuit board. And as it turned out they both take a common signal from a sensor in the tranny. So I wiggled the sensor connector at the tranny and made sure it was well and truely...well...connected (my first fear was I had buggered up the connector or sensor during the clutch work) This had no effect. So I studied the wiring schematics and found nothing. All fingers pointed to the the odometer itself. Having replaced the tachometer many years ago (it stuck at 4k at the track and refused to return to 0) I knew a new speedometer wasn't going to be cheap. But thank goodness for my Warranty. Time to test it out I guess. Sure enough they covered the cost of the $367.00 new speedometer odometer unit. My cost - $50.05. Whew! The dealership was kind enough to write the speedometer up as a work order so I was able to obtain a legitimate odometer replacement sticker verifying the cars actual mileage should I ever need to sell the car.
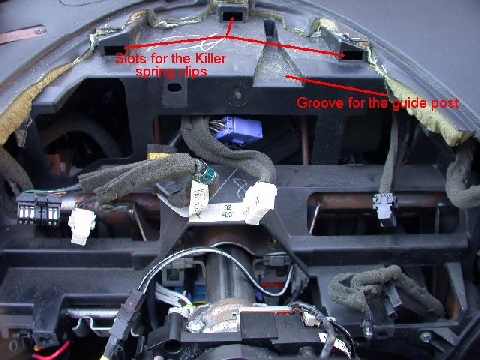
Since I've had the dash out three times already I just knew this was going to be a pain in the neck and as always it was a hair-raising experience. Once the main gauge cluster hood is out it's fairly straight forward but getting the hood clips to release from the dash is, well... traumatic. I won't go step by step but will hit the high points of what I had to do. First was to disconnect the gauges on the A-pillar and remove the A-pillar trim, pod, and gauges. Then I disconnected the shift light and removed the column boost gauge and trim piece. Then it's the side vent trim, the lower steering column trim, and the lower dash trim and airvent under the steering column that come out. Beware of the clips and pins on these things. They break easily if pulled in the wrong direction. Check the manual to see where all the clips are located because most of the pulling and tugging is done blind. All told about 5 screws. Don't forget to pull out the ignition key lightbulb from the lower column trim. Then it's simply 3 screws holding in the bottom of the gauge cluster and hood and the fun begins. See the main gauge cluster and hood is held in by three hefty spring clips along the forward edge of the hood by the windshield (see pic below). The hood assembly must be pulled towards you as you sit on the front edge of the drivers seat with your head wedged against the windshield. How the heck are you supposed to do this? Finger tips along the forward edge and pull...is all I can say. Don't use any screwdrivers, etc., as you will surely screw up the hood plastic. It's pretty thin. So you pull and pull, and the hood is flexing and creaking and you swear something is going to break and then KERSHNAPPPP. The three spring clips let go and you find yourself sitting in the drivers seat and the gauges and hood assembly resting on top of the steering column.
YEAH success as you hunt for any permenant
damage. Then it's simply a case of disconnecting the half dozen or so
electrical plugs to the rear of the gauge cluster (don't forget the small plug to the cigarette lighter) and pulling the whole
enchilada out of the car. There isn't a whole lot of slack in the wiring harness
so getting to the connectors can be a pain but treat them with respect as
the last thing you want to do is mess up a connector or pull a wire out of
the harness. And by the end of this exercise your fingertips should be numb
or in pain....mine were.

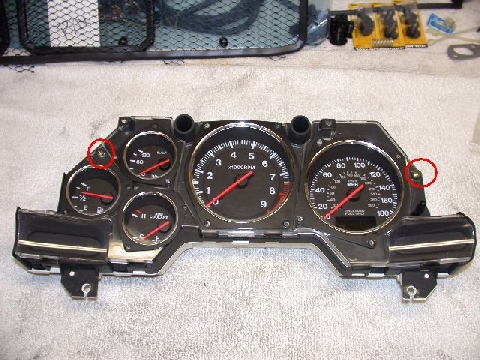
The gauge cluster is out and now sitting on your workbench. Picture the assembly as just a big sandwich. All one needs do is to keep removing layers. First separate the gauges from the hood (4 screws circled in below pic) BTW all the little brown/blue/black nubs in the back of this assembly are the dash light bulbs.
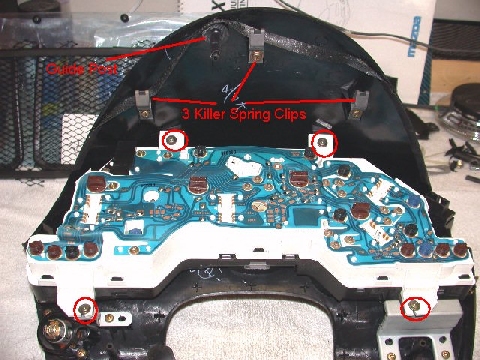
Then separate the gauge "windows" from the gauge housing (white structure in the back) and gauges. There are two screws from the front side (circled in below pic) and a series of clips around the perimeter of the assembly.
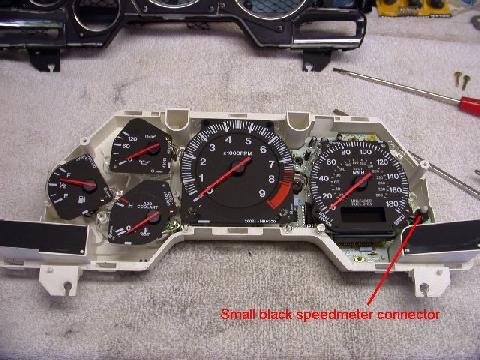
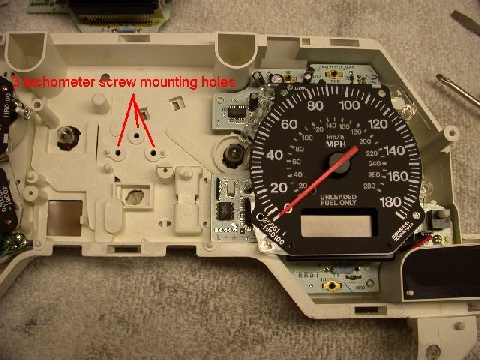
To remove each instrument there are several screws from the back that serve to hold the gauge/instrument to the gauge housing and provide electrical connection to the flexible (blue) circuit board. To remove the speedometer assembly the tachometer must be removed first. The tachometer is held in by three screws in a triangle right in the middle of the gauge back. (see pic below)
Next is removal of the speedometer assembly. This entails removal of 5 screws on the back (circled - see pic), one small black connector on the front side (two wires red and black - see above pic) and one very fragile electrical ribbon connector. (see below pic)
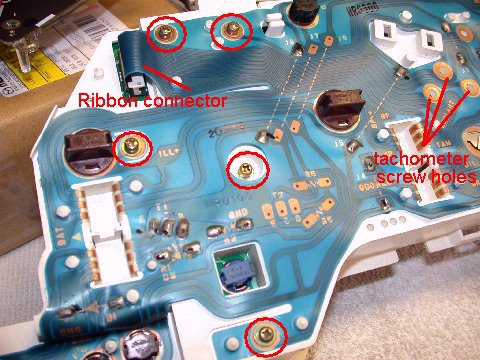
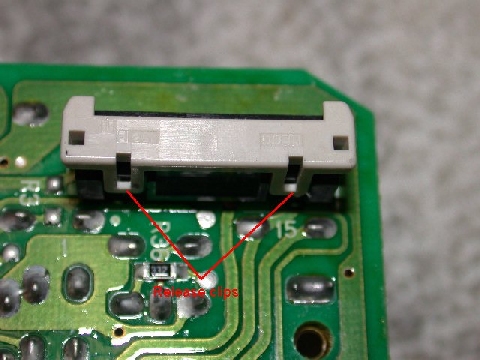
The flexible blue circuit board has a tongue that fits into the connector on the speedometer circuit board. Two small clips (see below pic) must be released and the white part of the clip slid up to remove the tongue from the connector. Don't just pull on the ribbon!
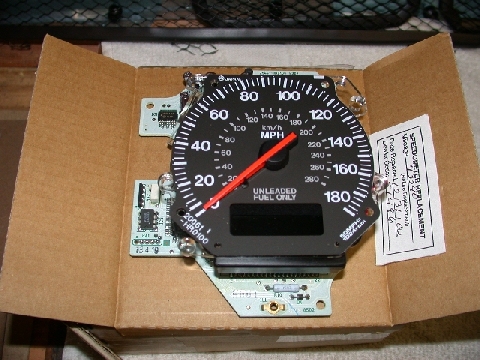
With everything disassembled, reassembly is really quite straightforward so I won't go into details. The only things to be careful of are reconnecting the new ribbon/tongue into the back of the new speedometer and making sure the small connector wiring on the front side isn't pinched. Then it's simply a case of reconnecting everything in reverse order. Don't worry about the electrical connectors when reinstalling into the dash each one is unique so it is impossible to reconnect them improperly. And then low and behold the lowest mileage FD ever! Registering only 1 mile on the odometer...I bet no one has ever seen THAT before!