
Continuing with upgrades after Rusty's first experience with real competition on the track below
is an improvement I hadn't considered until the cost was no longer an issue.
After being contacted by someone interested in my travails on the track
with Rusty, he put a bug in my ear that perhaps a Miata shirt shifter would work
in an FC. Now Ive always been interested in a short shifter for the racecar but
being the budget racer, shelling out $150 for a short shifter just wasnt in the
cards. Now I wonder about this Miata idea. Lets go shopping...on eBay. Its one
of those things where the price is just so low even if a project doesnt work theres
not so much pain at the thought you just flushed some of your hard earned cash.
So...Miata short shifter...$40. $40? Jeebus thats cheap! How can it be, given the
"other" FC shifters cost at least $120+ I simply had to try this. 4 days later it arrived.
Looked pretty decent...for a $40 shifter. Lets see if it fits.
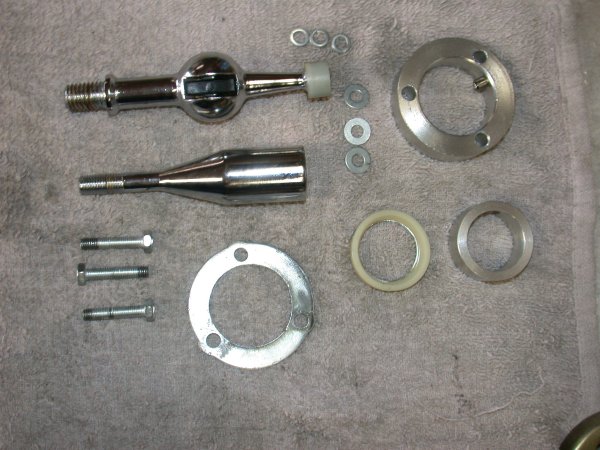
This is what I got for my $40: eBay Miata Short Shifter Components
Well it fit but there were two things that needed to be tweaked just a smidge but Im here
to say it works just fine. So lets begin. Remove the stock shift knob. Remove the trim and
leather shifter cover - it snaps right out (please excuse me if its more difficult removing
the trim in a car with a full interior because my car has none). Remove the two rubber shifter
boot covers. Remove the square metal retaining bracket on the tunnel and the thick rubber tranny boot. Now
remove the three 10mm bolts and lift out the stock shifter and shifter cover/boot.
Lets begin with the Miata SS. But first some observations about the Miata SS "kit."
The principle of the SS is that it moves the fulcrum of the shifting motion further
from the end in contact with the transmission. This is why the shuft "throws" become shorter.
It's not about cutting the top of the shifter. Comparing the stock shifter to the Miata SS, the SS
comes in two pieces that are threaded together. The stock shifter comes as two pieces but are bonded together with
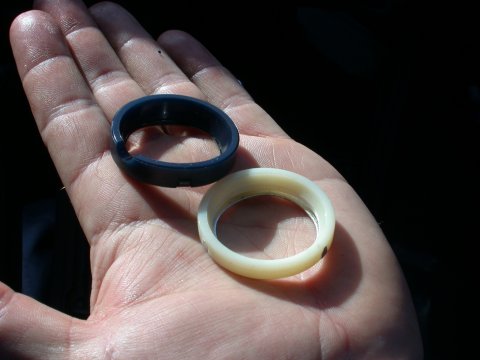
a rubber isolator -they do not come apart. The slot in the fulcrum ball of the SS has a plastic insert.
I'm concerned that this will wear out prematurely compared to the all metal slot of the OEM shifter
but for $40 what can you say? Note also the ball at the end of the shifter is smaller on the SS...more on
this later. Now on to the install.

One piece...two pieces.
Ok, first up, the lower OEM shifter bushing needs to be removed.
I also found it helpful to suck out as much of the tranny oil from the top reservoir as possible.
Turkey baster works great.

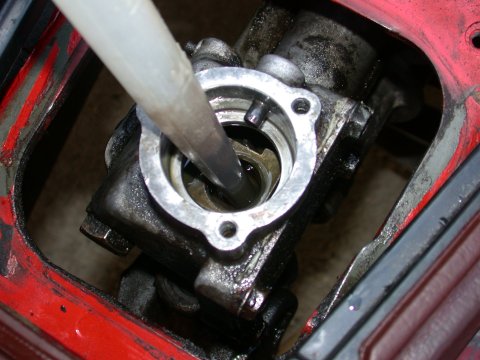
Removing the lower bushing. Sucking out the old "topside" gear oil.
Then the spacer bushing is dropped in followed by the stock lower shifter
bushing you just took out. If your stock shifter bushings are worn out Mazda sells a shifter
bushing kit for pretty cheap. Now woudl be a good time to replace them.
![]()

The short shifter lower spacer dropped in. And with lower shifter bushing on
top of the lower spacer.
Next up is a thin shim/spacer...that doesnt fit. The inner hole is too small to fit over the lower bushing. No problemo. A
few minutes with hand file and the inner diameter is now big enough to fit. I would
suppose that the shim would fit *under* the lower shifter bushing on a Miata. We still need to use it,
albeit in a different location, to ensure the SS fulcrum ball is at the right height. I applied a little bit
of High Temp RTV to seal the joints both on the top and bottom of the shim.
![]()
![]()
Opening up the inner hole on the shim. Installed shim with RTV.
On top of this goes the big spacer. Note there is a small
allen head bolt in the spacer to align the shifter the same way as the OEM shifter. The tranny has a pressed
in "pin" to locate the stock shifter. I used a little locktight on this small bolt after it was adjusted
to fit out far enough into the slot in the SS itself. Now you will note that the ball on the end of the
OEM shifter is much bigger than the ball on the end of the SS. So the kit comes with a small bushing
to make up for the difference.


The small bolt in the SS spacer - adjust and use locktite.
The small bushing for the shifter ball.
In theory the small bushing on the shifter ball fits into to receiver in the tranny where the old shifter
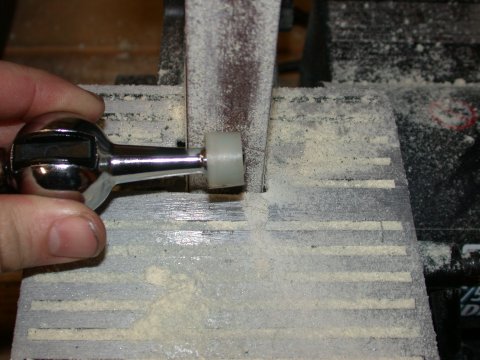
ball fit...on a miata. Trouble is the SS bushing is too large for the RX7 receiver so a few turns on my belt
sander and it is now the right diameter to fit into the tranny receiver. The bushing is thin so don't get too happy with the sanding!
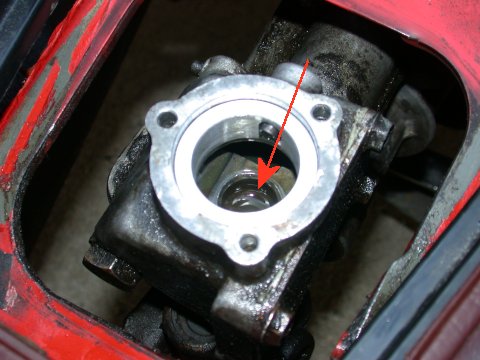
Reciever in the transmission the SS bushing is supposed to fit into.
A few turns on the beltsander and the bushing now fits fine.
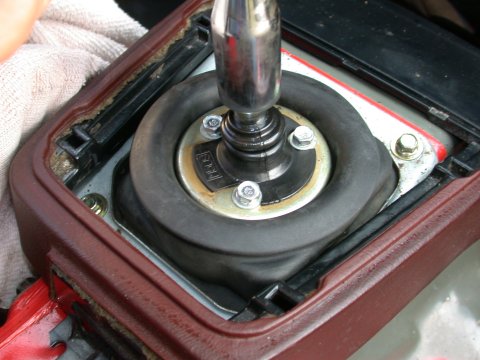
Refill the top reservoir of the tranny and drop in the lower half of new SS. There, of course, is a need for a topside
bushing. The bushing for the top side supplied with the SS kit did not have a
notch cut into it similar to the bottom side (notch for the bolt in the spacer) so I reused the one from
the stock shifter - in my case this was the blue bushing. Now since you have to remove the boot and shifter
cover from the stock shifter anyways this isnt an issue although its a struggle to remove the boot and
shifter cover from the stock shifter. It is possible to slide a flat tip screwdriver in between the shifter and the rubber
boot to get the lip of the rubber boot over and onto the thick part of the stock shifter
where it is easier to slid it off. Don't ask me how I know. If yours
looked like my original one I had to buy a new one anyway, a new boot/cover costs about $32 (Part#: M509-17-480A Boot, Dust.)
So....the topside bushing is dropped into place. To check you have it all assembled correctly the top of
the bushing should be about flush with the top of the spacer.

The stock upper bushing with the notch and the supplied Miata SS upper bushing with no notch which can't be used.
Short shifter, upper spacer, and upper bushing installed. The top half of the SS is pictured but I'd suggest just installing the lower half
to ease getting the shifter boot/cover on.
Now the shifter cover/boot can be slid over the lower half of the SS and bolted into place using the longer 10mm bolts (and flat and split
ring lock washers) supplied with the kit. I then screwed on the upper half of the SS. I used a bit
of lock-tight on the threads - the last thing I want is for the shifter to come off in my hand in
the middle of a race! The rest is just reinstalling the other rubber boot/covers and interior trim
pieces.

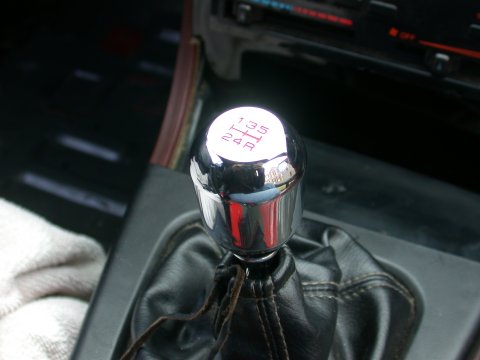
But what to do about the shift knob? The OEM shift knob has a thread that is too large for
the Miata SS so off to PepBoys I went in search of the cheapest shift a ball I could find. Hence the
$15 piece of crap shift ball you see pictured. All I wanted was a nice solid AL ball threaded to
fit the shifter...makes me sad that what I ended up with was the best PepBoys had to offer.
Still, after a short drive in Rusty the throw is nice and short and very crisp. Coupled with
the new clutch I think Im going to like it very much on the track.

I couldn't do it....that nasty cheap plastic Pepboys special had to go. It was suggested that a
Honda shift knob would fit with a little help. eBay to the rescue and for $18 I had nice polished
solid AL shift knob from a Honda Integra Type-R. It did require retapping the shifter threads but
no big deal. I no longer feel like the plastic is going to crumble under a death grip shift
going into Turn 1 and 100mph.

7-UP CLUB
MAIN
OUR "LOCAL7"
COMMUNITY | THE
WORLD OF THE RX-7
This page last updated March 19, 2006